📂 Understanding "Committed" Media
When an applicant attaches a file from their Media Library to an In Progress form, that file becomes Committed.
What it means: A committed file is "locked." To ensure the data stays consistent while the form is being worked on, the file cannot be edited or deleted from the Media Library.
How to "Uncommit" a file:
Detach it: Remove the file from the In Progress form.
Submit the form: Once a form is submitted, the system takes a "snapshot" copy for the record. This "frees up" the original version in the library for modification or deletion without affecting the submitted application.
Example of a committed file:
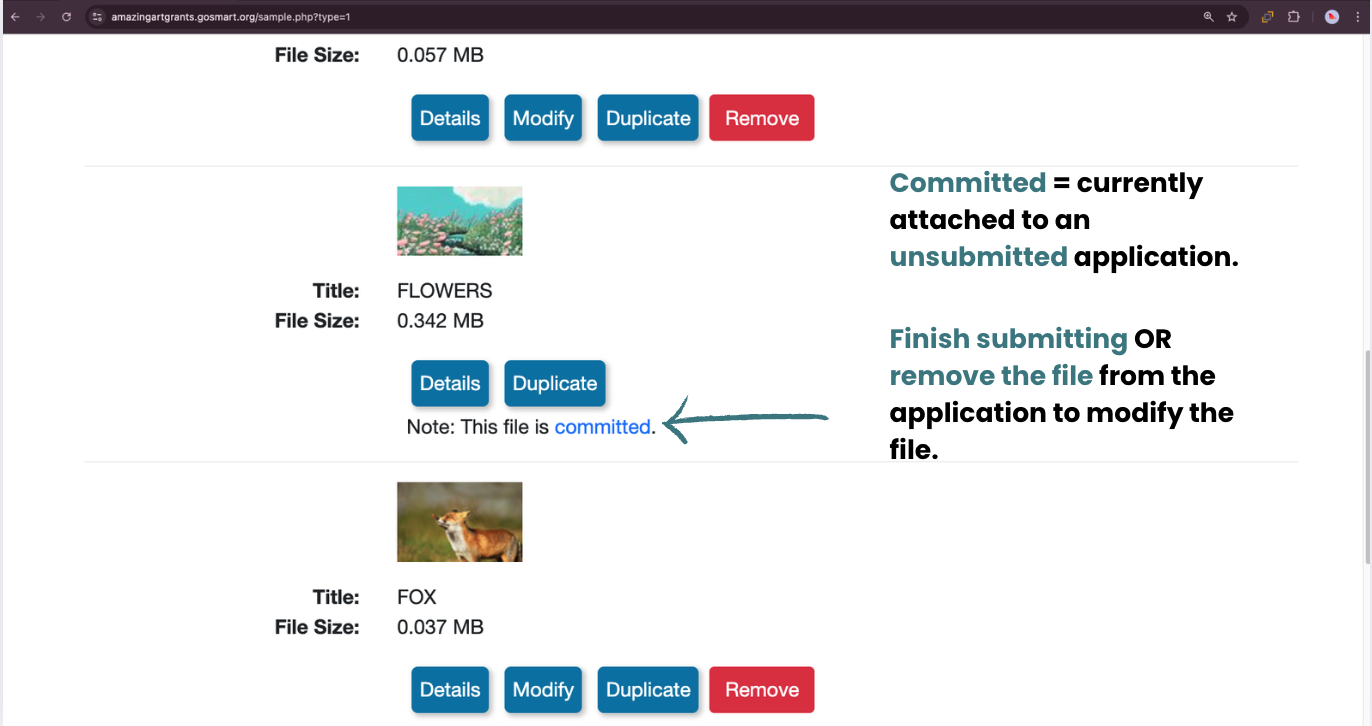
📸 Click here for image alt-text.
A screenshot of an online media library showing three uploaded files: a flower image, a fox image, and a small thumbnail. Large teal text overlays the right side explaining that 'Committed' means a file is attached to an unsubmitted application. An arrow points to a note under the flowers' image titled 'FLOWERS' which reads 'Note: This file is committed.' The text explains that the user must either finish submitting the file or remove it from the application to modify it.
💡 Tip: Think of a committed file like a letter inside a sealed envelope. If you want to change what the letter says, you have to "open the envelope" (detach it) first!
🛠️ How to Detach a Media File
Follow these steps to remove a file:
For Applicants:
Access your portal at your agency's GO Smart URL.
Go to the Grant Applications & Forms tab. Locate your grant and click Edit to enter the form.
Go to the Media Library Selection page (often named "Support Materials" or "Work Samples").
Click the Attach [Media] button for the item you want to remove.
Uncheck the box next to the file you want to detach.
Click Save in the pop-up window.
The file is no longer listed in the "Attached Media" section at the bottom of the page. Click Save and Next to finalize the change.
🎥 Click here for video alt-text.
30-second video of an applicant user removing a committed media file from their Media Library Selection page. The user clicks "Attach Image" and selects two images titled "BLACK CAT" and "FLOWERS" by checking their respective boxes and clicking Save. The user scrolls down to the "Attached Media" section, which displays a grid of uploaded files: The user clicks Save and Next at the bottom of the page.
For Admins (Assisting an Applicant):
Go to the Grant Manager tab → Grant Manager Dashboard subtab.
Select your Program/Cycle and locate the application.
Click the Log In As Applicant link to view the portal as that applicant.
Follow the "For Applicants" steps above to uncheck the file and save the changes.
💡 Tip: Remind applicants that "Saving" the selection pop-up is different from "Saving" the application page. They must do both to ensure the file is successfully detached.
📝 Note: If an applicant is allowed to edit their application after submission to work on the Media Library page, remind them to verify that the correct file version is attached before resubmitting.
✍️ How to Modify a Committed File
If you need to edit the details (like the title or description) of a file that is currently locked, follow the Detach-Edit-Reattach loop:
Detach: Follow the steps above to uncheck the file in the form, then click Save.
Edit: Return to your Media Library. The file is now "uncommitted," so you can click Modify to make your changes.
Reattach: Return to your form's Media Library Selection page, click Attach [Media], check the box for your newly edited file, and click Save.
Where to find the details, modify, duplicate, and remove buttons:
🎥 Click here for video alt-text.
A screen recording of an "Image Library" web interface demonstrating file management options for three images: "BLACK CAT," "FLOWERS," and "FOX." The video highlights button functions, including Details, Modify, Duplicate, and Remove.
👯 Duplicating Committed Files
Attach the same committed file to as many different forms as you like. If you want to use a modified version for a second form while keeping the original version locked in the first form:
Duplicate: In your Media Library, use the Duplicate tool to create a second copy of the file.
Modify: Edit the new duplicate copy.
Attach: Attach the modified duplicate to your second form.