📍Where to Find the Text Editor
Find these tools when you see a text field that allows formatting. Key locations include:
Front End Manager: Agency Editor (Home Message), Profile Editor (Instructional Text), and Navigation Editor.
Grant Editor → Program Cycles: Program Description, Program Message, Submission Text, and Confirmation Text.
Grant Editor → Cycle Pages: Page Info/Instructional Text.
Questions: While you can format question text, we recommend keeping it simple for accessibility.
Panel Editor → Panel Builder: Configure Panel
🛠️ Overview of Editing Tools
The toolbar provides several familiar formatting options:
Styles: Bold, Italicize, and Underline.
Lists: Bulleted and Numbered lists.
Visuals: Adjust Size and Color.
Utility: Standard Cut, Copy, and Paste functions.
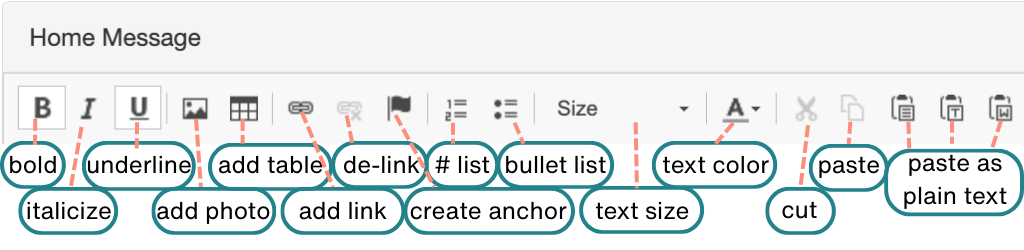
👉 Click this link to view the graphic with alt-text.
💡 Tips:
Stick to a limited color palette to boost branding and professionalism.
By using a primary, secondary, and neutral color, you’ll ensure visual consistency and create a more polished experience for applicants.
Adjusting text size is recommended in lieu of bolding in some areas for a cleaner look.
🔗 Linking Files and Websites
Help applicants find the information they need by creating direct links.
Link to a File on Your Server
Select Content: Highlight the text or image you want to link.
Open Link Tool: Click the 🔗 Link icon.
Browse Server: Click Browse Server. If your file isn't uploaded yet:
Click Upload, then select your file (up to 5 at once).
Click Upload again and wait for the "success" message.
Finalize: Select the file from your list, click Select, then click OK.
🎥 Click here for video alt-text.
A screen recording demonstrating how to link a file to text within the "Home Message" editor. The user highlights a heading, opens the link properties, uploads a PDF file from their computer, and saves it as a functional download link.
📝 Note: For better organization, create folders on your server before uploading dozens of files.
Link to an External Website
Select Content: Highlight text and click the 🔗 Link button.
Enter URL: Paste the web address (e.g.,
wearecreativewest.org) into the URL field.Confirm: Keep the default
https://protocol and click OK.
🎥 Click here for video alt-text.
A screen recording demonstrating how to add a hyperlink to text within the "Home Message" editor. The user selects text, opens the link tool, enters a URL, and saves the changes.
📊 Creating and Formatting Tables
Tables are excellent for organizing data, such as budget examples or timeline dates.
Insert Table: Position your cursor, then click the Table Properties icon (a small calendar).
Configure Size: The default is 3 rows by 2 columns with a width of 500 (highly recommended for mobile responsiveness).
Set Headers: Use the dropdown to designate the first row or column as a header for better readability.
Style: Add a border or set the alignment (Left, Center, Right). Click OK to insert.
🎥 Click here for video alt-text.
A screen recording demonstrating how to insert and configure a table within the "Home Message" editor. The user selects the table tool, sets the number of rows and columns, applies a header row and centered alignment, adds a caption, and then populates the table headers.
⚠️ Alert: Cell spacing and padding settings are currently not functional in the editor; use standard width settings to ensure the table looks consistent.
🖼️ Adding Images
Visuals can make your instructions much clearer. You have two ways to add them:
Option 1: From Your Computer
Position Cursor: Click where you want the image to appear.
Open Manager: Click the Image icon.
Upload/Select: Use Browse Server to pick an existing image, or use the Upload button to add a new file from your device.
Customize: Adjust the Width and Height.
Align: Choose "Left" or "Right" alignment to wrap text around the image.
🎥 Click here for video alt-text.
A screen recording demonstrating how to upload and format an image within the "Home Message" editor. The user accesses the image properties, uploads a file from their computer, adjusts the image dimensions and alignment, and adds horizontal spacing before inserting it into the document.
💡 Tips:
Use a pixel value of 10 in the HSpace and VSpace fields when adding images; this keeps the text from touching the edges of your picture.
Click the Lock icon to prevent your image from being stretched or squished!
Option 2: From the Internet
Open Settings: Click the Image icon.
Paste URL: Copy the direct web address of the image and paste it into the URL field.
Preview & Insert: Click any white space to see a preview, then click OK.
🎥 Click here for video alt-text.
A screen recording demonstrating how to insert an image into the "Home Message" editor using a web URL. The user opens the image properties, pastes a direct image link from another website into the URL field, and saves to display the external image in the editor.
⚓ Creating a Table of Contents (Anchors)
Use Anchors to create a "jump-to" Table of Contents (ToC). This allows applicants to click a link at the top and skip directly to a specific section below.
Phase 1: Set Your "Destination" Anchors
Before you can link to a section, you must tell the system where the "jump" should land.
Position Your Cursor: Place the cursor at the very beginning of the paragraph or header you want to jump to.
Create the Anchor: Click the Anchor icon (a small flag).
Name the Spot: Enter a short, unique name or phrase (e.g., Eligibility or Narrative). Click OK.
Verify: You will see a small red flag icon in your text.
Repeat: Place anchors at every point you want to include in your Table of Contents.
Phase 2: Build and Link Your Index
Now that your destinations are set, create the clickable list at the top of your page.
Type the Index: Scroll to the top of your text field and type your Table of Contents (e.g., 1. Eligibility, 2. Required Documents, 3. Deadline).
Format: Use a bulleted list or bold icons to make your index look organized.
Link to the Anchor:
Highlight the first item in your index (e.g., "Eligibility").
Click the Link icon.
Set the Target: Click the Target tab and select Same Window (_self) from the dropdown menu.
Set the Link Type: Click the Link Info tab and change the Link Type dropdown to Link to anchor in the text.
Select the Anchor: Under the By Anchor Name dropdown, choose the name you created in Phase 1.
Confirm: Click OK. Your text is now a clickable link that jumps down to the corresponding flag.
Complete the List: Repeat these steps for the remaining items in your Table of Contents.
🎥 Click here for video alt-text.
A screen recording demonstrating how to build a clickable Table of Contents using anchors in the "Home Message" editor. The user tags section headings with anchors and inserts jump links at the top of the document to allow quick page navigation.
⚠️ Alert: Always set your Target to "Same Window (_self)." If you leave it at the default, the link might try to open the same page in a new tab, which can confuse applicants.
📝 Note: If you move text around later, the red anchor flag moves with it. If you delete the line containing the flag, you will need to recreate the anchor and update your link.
💡 Tip: Keep your anchor names short. One-word names like "Budget" are much easier to manage in the dropdown list than long sentences.
📧 Setting Up Email Links
Make it easy for applicants to ask questions by creating a "pre-set" email link.
Select Text: Highlight the text (e.g., "Email the Grant Manager").
Open Link: Click the Link icon and change the Link Type to Email.
Set Details: Enter the admin email address, a Subject Line (e.g., "Assistance Requested"), and a short Message Body prompt.
Confirm: Click OK. When applicants click this, their email app will open automatically.
🎥 Click here for video alt-text.
A screen recording demonstrating how to create an email link within the "Home Message" editor. The user selects text, chooses the email link type, and fills in the recipient address, subject line, and body text before saving.